Quickstart
By the end of this guide you'll have a working MCP server with one mcp tool : say_hello, running locally and tested with the MCP Inspector.
Prerequisites: the SDK installed (Rust 1.80+).
Step 1 - Create the project
cargo new hello-mcp && cd hello-mcp
Step 2 - Add dependencies
cargo add rust-mcp-sdk@1 async-trait serde serde_json tokio
Step 3: Define the say_hello tool
Create a new module in the project named tools.rs and define the say_hello tool within it.
The mcp_tool and JsonSchema macros provided by the rust-mcp-macros crate make it straightforward to turn a simple Rust struct into a fully compliant MCP tool.
use rust_mcp_sdk::schema::{CallToolResult, TextContent, schema_utils::CallToolError};
use rust_mcp_sdk::macros::{JsonSchema, mcp_tool};

#[mcp_tool(
    name = "say_hello",
    description = "Accepts a person's name and says a personalized \"Hello\" to that person",
    icons = [
        (src = "https://raw.githubusercontent.com/rust-mcp-stack/rust-mcp-sdk/main/assets/hello_icon.png", mime_type = "image/png", sizes = ["128x128"]),
    ]
)]
#[derive(Debug, ::serde::Deserialize, ::serde::Serialize, JsonSchema)]
pub struct SayHelloTool {
    /// The name of the person to greet with a "Hello".
    name: String,
}

impl SayHelloTool {
    pub fn call_tool(&self) -> Result<CallToolResult, CallToolError> {
        let hello_message = format!("Hello, {}!", self.name);
        Ok(CallToolResult::text_content(vec![TextContent::from(
            hello_message,
        )]))
    }
}
When your server grows beyond a single tool, register them all with tool_box! - it generates a dispatch enum so you don't have to match tool names by hand. See Build Your First MCP Server for a full multi-tool walkthrough.
Step 4: Create a handler for handling MCP Messages
We need to create a handler (handler.rs) for handling MCP messages including requests and notifications coming from the MCP Client.
Note: rust-mcp-sdk provides two types of handler traits to choose from:
mcp_server_handler, which is recommended for most use cases, andmcp_server_handler_core, which gives you greater control but requires you to handle every incoming request, notification, and error yourself.
For this example we create a simple struct, and implement the mcp_server_handler trait for it, overriding two methods that we need:
handle_list_tools_request()that returns list of available tools our server supports.handle_call_tool_request()that will be called when MCP Client requests our server to call a tool and return the result.
Lets do that, by adding a new module to the main.rs and creating the module file : handler.rs
use crate::tools::SayHelloTool;
use async_trait::async_trait;
use rust_mcp_sdk::{
    McpServer,
    mcp_server::ServerHandler,
    schema::{
        CallToolRequestParams, CallToolResult, ListToolsResult, PaginatedRequestParams, RpcError,
        schema_utils::CallToolError,
    },
};
use std::sync::Arc;

// Custom Handler to handle MCP Messages
pub struct HelloMcpHandler;

#[async_trait]
impl ServerHandler for HelloMcpHandler {
    // Handle ListToolsRequest, return list of available tools as ListToolsResult
    async fn handle_list_tools_request(
        &self,
        _params: Option<PaginatedRequestParams>,
        _runtime: Arc<dyn McpServer>,
    ) -> std::result::Result<ListToolsResult, RpcError> {
        Ok(ListToolsResult {
            meta: None,
            next_cursor: None,
            tools: vec![SayHelloTool::tool()],
        })
    }

    // Handles incoming CallToolRequest and processes it
    async fn handle_call_tool_request(
        &self,
        params: CallToolRequestParams,
        _runtime: Arc<dyn McpServer>,
    ) -> std::result::Result<CallToolResult, CallToolError> {
        // Match the requested tool by name
        if params.name == SayHelloTool::tool_name() {
            // Deserialize the arguments into our tool struct and execute it
            let say_hello: SayHelloTool =
                serde_json::from_value(params.arguments.unwrap_or_default().into())
                    .map_err(CallToolError::new)?;
            say_hello.call_tool()
        } else {
            Err(CallToolError::unknown_tool(params.name))
        }
    }
}
Note: Matching tools by hand keeps the quickstart minimal - perfectly fine for a single tool. For real-world servers, let
tool_box!generate this dispatch (including argument parsing and richer error handling) for you - see Build Your First MCP Server.
Step 5: Create and start the Server!
Now we have all the components necessary for our MCP Server , we need to update our main() function to setup a MCP Server using our handler and fire it up!
It can be done in three simple steps:
- Define the MCP server capabilities: in this example, we’ll expose tools only.
- Choose a transport : you can use either the stdio transport or the Streamable HTTP transport.
- Create and start the server.
Here you can see the updated main file:
- Stdio
- Streamable HTTP
mod handler;
mod tools;
use rust_mcp_sdk::{
    self, McpServer, StdioTransport, ToMcpServerHandler, TransportOptions,
    error::SdkResult,
    mcp_icon,
    mcp_server::{McpServerOptions, server_runtime},
    schema::{
        Implementation, InitializeResult, ProtocolVersion, ServerCapabilities,
        ServerCapabilitiesTools,
    },
};

use crate::handler::HelloMcpHandler;

#[tokio::main]
async fn main() -> SdkResult<()> {
    // server name, version and capabilities
    let server_details = InitializeResult {
        server_info: Implementation {
            name: "hello-mcp".into(),
            version: "0.1.0".into(),
            description: Some("Simple hello world mcp server with a couple of tools!".into()),
            icons: vec![mcp_icon!(
                src = "https://raw.githubusercontent.com/rust-mcp-stack/rust-mcp-sdk/main/assets/rust-mcp-icon.png",
                mime_type = "image/png",
                sizes = ["128x128"],
                theme = "light"
            )],
            website_url: Some("https://github.com/rust-mcp-stack/rust-mcp-sdk".into()),
            title: Some("Hello MCP Server!".into()),
        },
        capabilities: ServerCapabilities {
            tools: Some(ServerCapabilitiesTools::default()),
            ..Default::default()
        },
        protocol_version: ProtocolVersion::V2025_11_25.into(),
        instructions: None,
        meta: None,
    };

    let transport = StdioTransport::new(TransportOptions::default())?;

    // instantiate our custom handler for handling MCP messages
    let handler = HelloMcpHandler {};

    // create the MCP server
    let server = server_runtime::create_server(McpServerOptions {
        server_details,
        transport,
        handler: handler.to_mcp_server_handler(),
        task_store: None,
        client_task_store: None,
        message_observer: None,
    });

    // Start the server
    server.start().await
}
cargo build --release
Pick a backend - both expose the MCP server at http://127.0.0.1:8080/mcp:
- Axum
- Actix-web
cargo add rust-mcp-axum
mod handler;
mod tools;
use rust_mcp_sdk::{
    self, ToMcpServerHandler,
    error::SdkResult,
    mcp_icon,
    schema::{
        Implementation, InitializeResult, ProtocolVersion, ServerCapabilities,
        ServerCapabilitiesTools,
    },
};

use crate::handler::HelloMcpHandler;

#[tokio::main]
async fn main() -> SdkResult<()> {
    // server name, version and capabilities
    let server_details = InitializeResult {
        server_info: Implementation {
            name: "hello-mcp".into(),
            version: "0.1.0".into(),
            description: Some("Simple hello world mcp server with a couple of tools!".into()),
            icons: vec![mcp_icon!(
                src = "https://raw.githubusercontent.com/rust-mcp-stack/rust-mcp-sdk/main/assets/rust-mcp-icon.png",
                mime_type = "image/png",
                sizes = ["128x128"],
                theme = "light"
            )],
            website_url: Some("https://github.com/rust-mcp-stack/rust-mcp-sdk".into()),
            title: Some("Hello MCP Server!".into()),
        },
        capabilities: ServerCapabilities {
            tools: Some(ServerCapabilitiesTools::default()),
            ..Default::default()
        },
        protocol_version: ProtocolVersion::V2025_11_25.into(),
        instructions: None,
        meta: None,
    };

    // instantiate our custom handler for handling MCP messages
    let handler = HelloMcpHandler {};

    // create mcp server
    let server = rust_mcp_axum::create_axum_server(
        server_details,
        handler.to_mcp_server_handler(),
        rust_mcp_axum::AxumServerOptions::default(),
    );

    // Start the server. by default, the MCP server is available at `http://127.0.0.1:8080/mcp`.
    server.start().await?;
    Ok(())
}
cargo add rust-mcp-actix
mod handler;
mod tools;
use rust_mcp_sdk::{
    self, ToMcpServerHandler,
    error::SdkResult,
    mcp_icon,
    schema::{
        Implementation, InitializeResult, ProtocolVersion, ServerCapabilities,
        ServerCapabilitiesTools,
    },
};

use crate::handler::HelloMcpHandler;

#[tokio::main]
async fn main() -> SdkResult<()> {
    // server name, version and capabilities
    let server_details = InitializeResult {
        server_info: Implementation {
            name: "hello-mcp".into(),
            version: "0.1.0".into(),
            description: Some("Simple hello world mcp server with a couple of tools!".into()),
            icons: vec![mcp_icon!(
                src = "https://raw.githubusercontent.com/rust-mcp-stack/rust-mcp-sdk/main/assets/rust-mcp-icon.png",
                mime_type = "image/png",
                sizes = ["128x128"],
                theme = "light"
            )],
            website_url: Some("https://github.com/rust-mcp-stack/rust-mcp-sdk".into()),
            title: Some("Hello MCP Server!".into()),
        },
        capabilities: ServerCapabilities {
            tools: Some(ServerCapabilitiesTools::default()),
            ..Default::default()
        },
        protocol_version: ProtocolVersion::V2025_11_25.into(),
        instructions: None,
        meta: None,
    };

    // instantiate our custom handler for handling MCP messages
    let handler = HelloMcpHandler {};

    // create mcp server
    let server = rust_mcp_actix::create_actix_server(
        server_details,
        handler.to_mcp_server_handler(),
        rust_mcp_actix::ActixServerOptions::default(),
    );

    // Start the server. by default, the MCP server is available at `http://127.0.0.1:8080/mcp`.
    server.start().await?;
    Ok(())
}
cargo run
# Streamable HTTP available at http://127.0.0.1:8080/mcp
Step 5 - Test with MCP Inspector
The MCP Inspector is a visual tool for exploring MCP servers.
- Stdio
- Streamable HTTP
Build the release binary first:
cargo build --release
Then launch the @modelcontextprotocol/inspector, passing it the path of the hello-mcp binary:
cd target/release
npx -y @modelcontextprotocol/inspector@latest ./hello-mcp
The path is resolved from the directory where
npxruns - so eithercdnext to the binary first, or pass an absolute path like/Users/Shared/hello-mcp/target/release/hello-mcp.
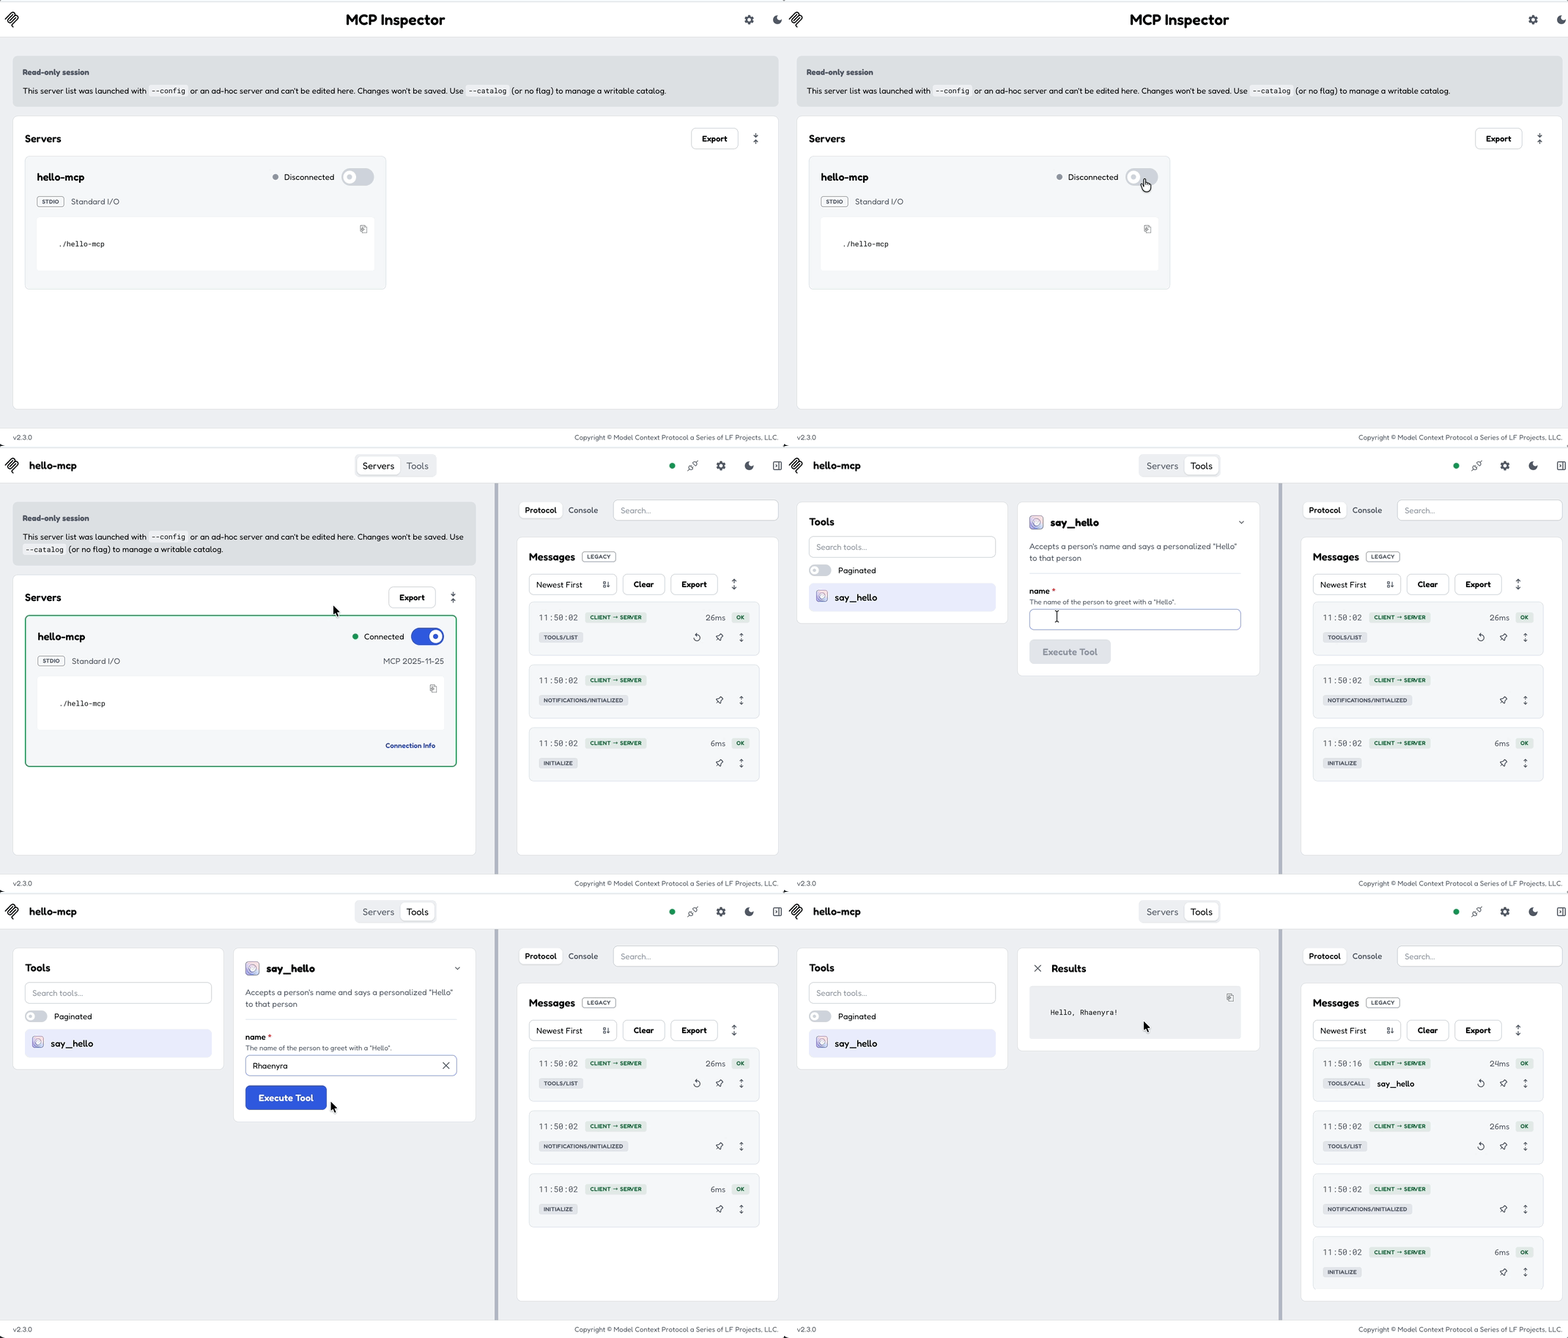
Start the server
cargo run
Launch the @modelcontextprotocol/inspector using HTTP transport and provide the MCP endpoint URL for hello-mcp:
npx -y @modelcontextprotocol/inspector@latest \
  --transport http \
  --server-url http://127.0.0.1:8080/mcp
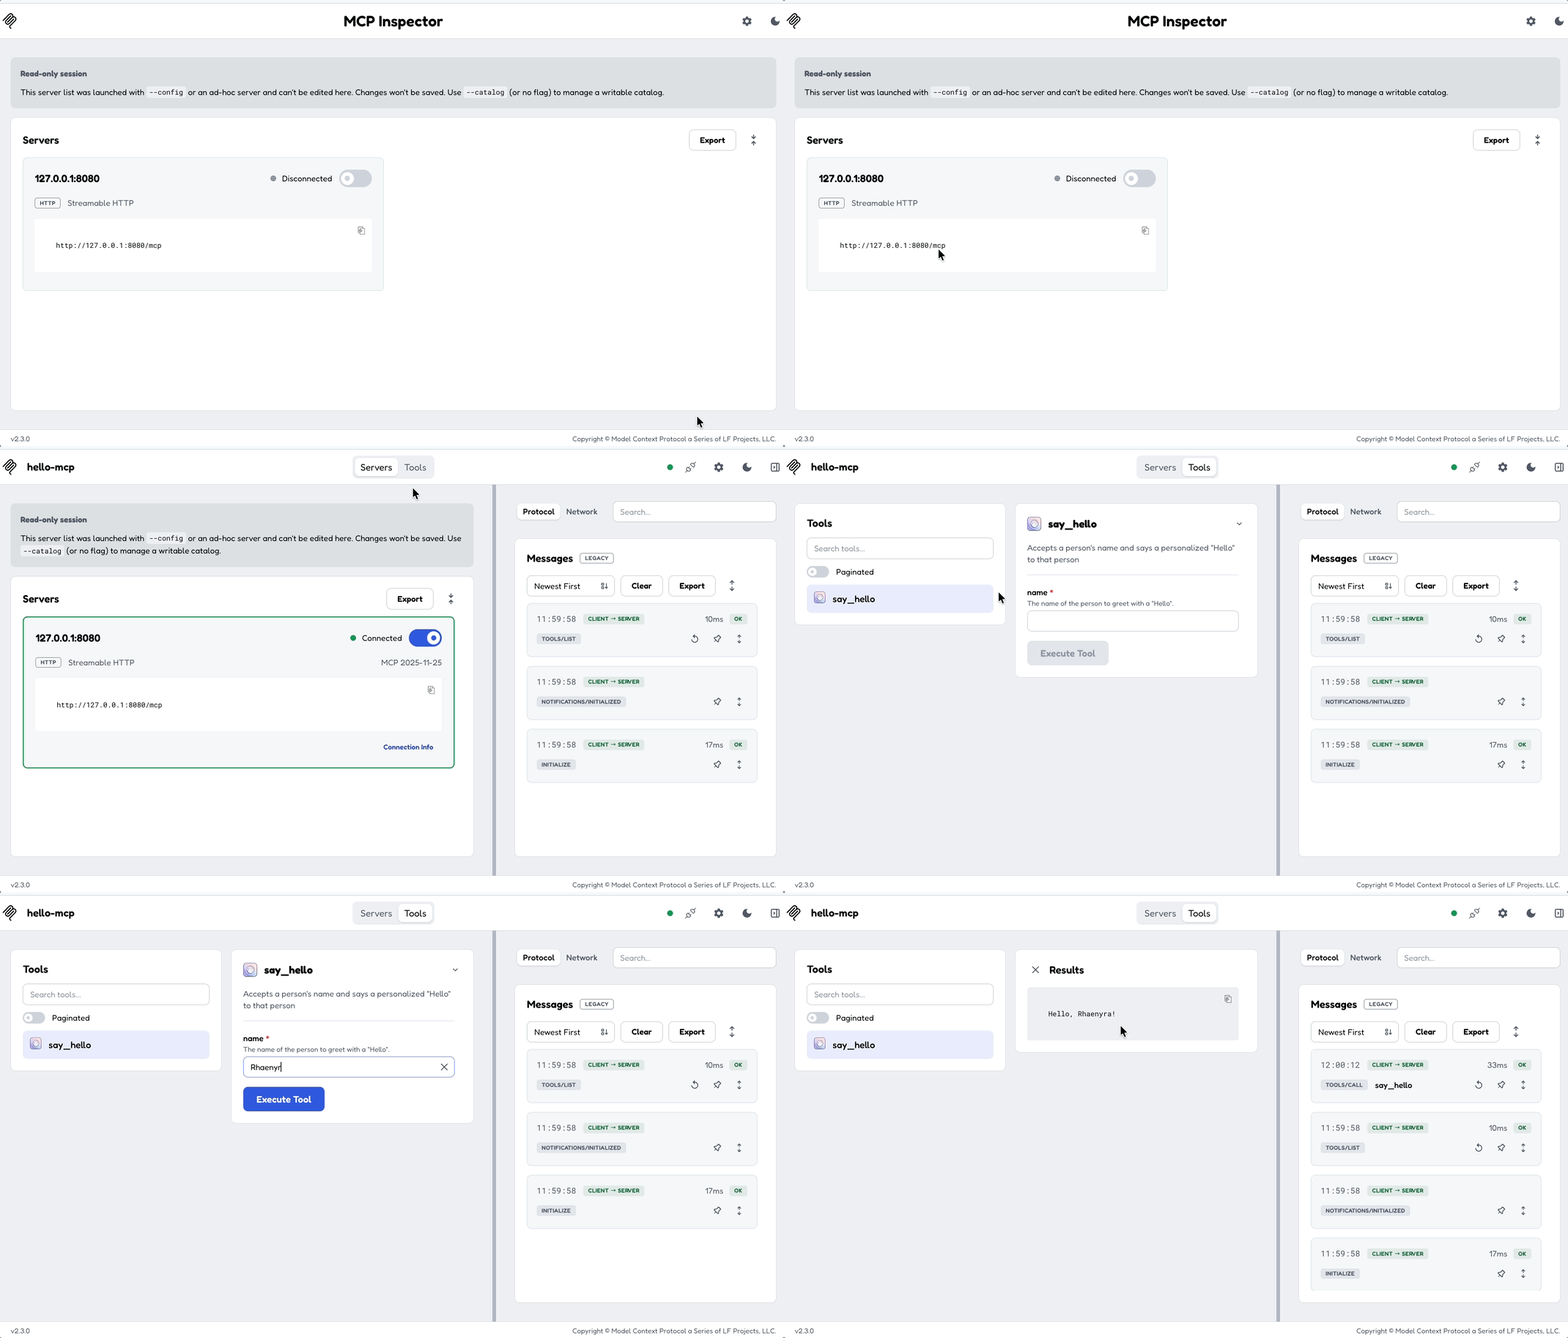
Where to go next
Your server works. Now grow it - each page continues from the one before:
- Add a Resource - expose data the LLM can read
- Add a Prompt - add a reusable prompt template
- Build a Client - connect to any MCP server programmatically
Or jump to a scenario:
- 🔐 Need authentication? → Add OAuth to Your Server
- 🧩 Have an existing Axum/Actix app? → Embed MCP (BYO)
- ⏳ Long-running operations? → Tasks