Add OAuth to Your Server
Protect your MCP server so only authenticated clients can access it. This tutorial uses Keycloak (free, open-source) through rust-mcp-extra's ready-made KeycloakAuthProvider.
The SDK's generic RemoteAuthProvider works with any OAuth 2.0 / OpenID Connect server, and rust-mcp-extra ships drop-in providers for Keycloak, WorkOS, and Scalekit. See Supported providers below.
What you'll build: an MCP server that requires a valid OAuth token to access tools. Unauthenticated clients get a 401. Authenticated clients can access all capabilities.
Prerequisites: Docker (for Keycloak), Deploy Your Server over HTTP completed.
Step 1 - Start Keycloak
Follow the official MCP authorization tutorial to start Keycloak and create a confidential client. When complete, you'll have:
export AUTH_SERVER=http://localhost:8080/realms/master
export CLIENT_ID=your-client-id
export CLIENT_SECRET=your-client-secret
export MCP_SERVER_URL=http://localhost:3000   # this MCP server's public URL
Step 2 - Add dependencies
cargo add rust-mcp-axum rust-mcp-extra
# auth support is included by default in rust-mcp-sdk
Step 3 - Create the auth provider
KeycloakAuthProvider bundles everything for you: it discovers Keycloak's OAuth metadata, verifies every incoming token (JWKS signature validation first, introspection fallback), and serves the OAuth endpoints clients need. Just point it at your realm and supply your client credentials:
use rust_mcp_extra::auth_provider::keycloak::{KeycloakAuthOptions, KeycloakAuthProvider};
use rust_mcp_sdk::auth::Audience;
use std::env;

pub async fn create_auth_provider() -> SdkResult<KeycloakAuthProvider> {
    KeycloakAuthProvider::new(KeycloakAuthOptions {
        keycloak_base_url: env::var("AUTH_SERVER")
            .unwrap_or("http://localhost:8080/realms/master".to_string()),
        mcp_server_url: "http://127.0.0.1:3000/".to_string(),
        resource_name: Some("Keycloak Oauth Test MCP Server".to_string()),
        required_scopes: Some(vec!["mcp:tools"]),
        client_id: env::var("CLIENT_ID").ok(),
        client_secret: env::var("CLIENT_SECRET").ok(),
        token_verifier: None,
        resource_documentation: None,
        validate_audience: Some(Audience::Single("mcp:tools".into())),
        disable_audience_validation: true,
    })
}
Step 4 - Wire it into the server
#[tokio::main]
async fn main() -> SdkResult<()> {
    // ... build server_details and your handler ...

    let provider = create_auth_provider().await?;

    let server = create_axum_server(
        server_details,
        handler.to_mcp_server_handler(),
        AxumServerOptions {
            host: "localhost".into(),
            port: 8080,
            // using port 3000 to avoid clashing with Keycloak on 8080
            port: 3000,
            event_store: Some(Arc::new(InMemoryEventStore::default())), // enable resumability
            auth: Some(Arc::new(provider)), // enable authentication
            ..Default::default()
        },
    );

    server.start().await?;
    Ok(())
}
That's it. Unauthenticated requests now receive a 401 pointing clients at your identity provider, and every bearer token is verified before reaching your handlers.
Step 5 - Access auth info in handlers
Once a client authenticates, you can inspect the verified token claims:
async fn handle_call_tool_request(
    &self,
    params: CallToolRequestParams,
    runtime: Arc<dyn McpServer>,
) -> Result<CallToolResult, CallToolError> {
    let auth = runtime.auth_info().await;
    if let Some(info) = &*auth {
        tracing::info!("Authenticated user: {:?}", info.user_id);
    }

    // ... tool logic ...
}
Step 6 - Run and test
export AUTH_SERVER=http://localhost:8080/realms/master
export CLIENT_ID=your-client-id
export CLIENT_SECRET=your-client-secret
export MCP_SERVER_URL=http://localhost:3000
cargo run
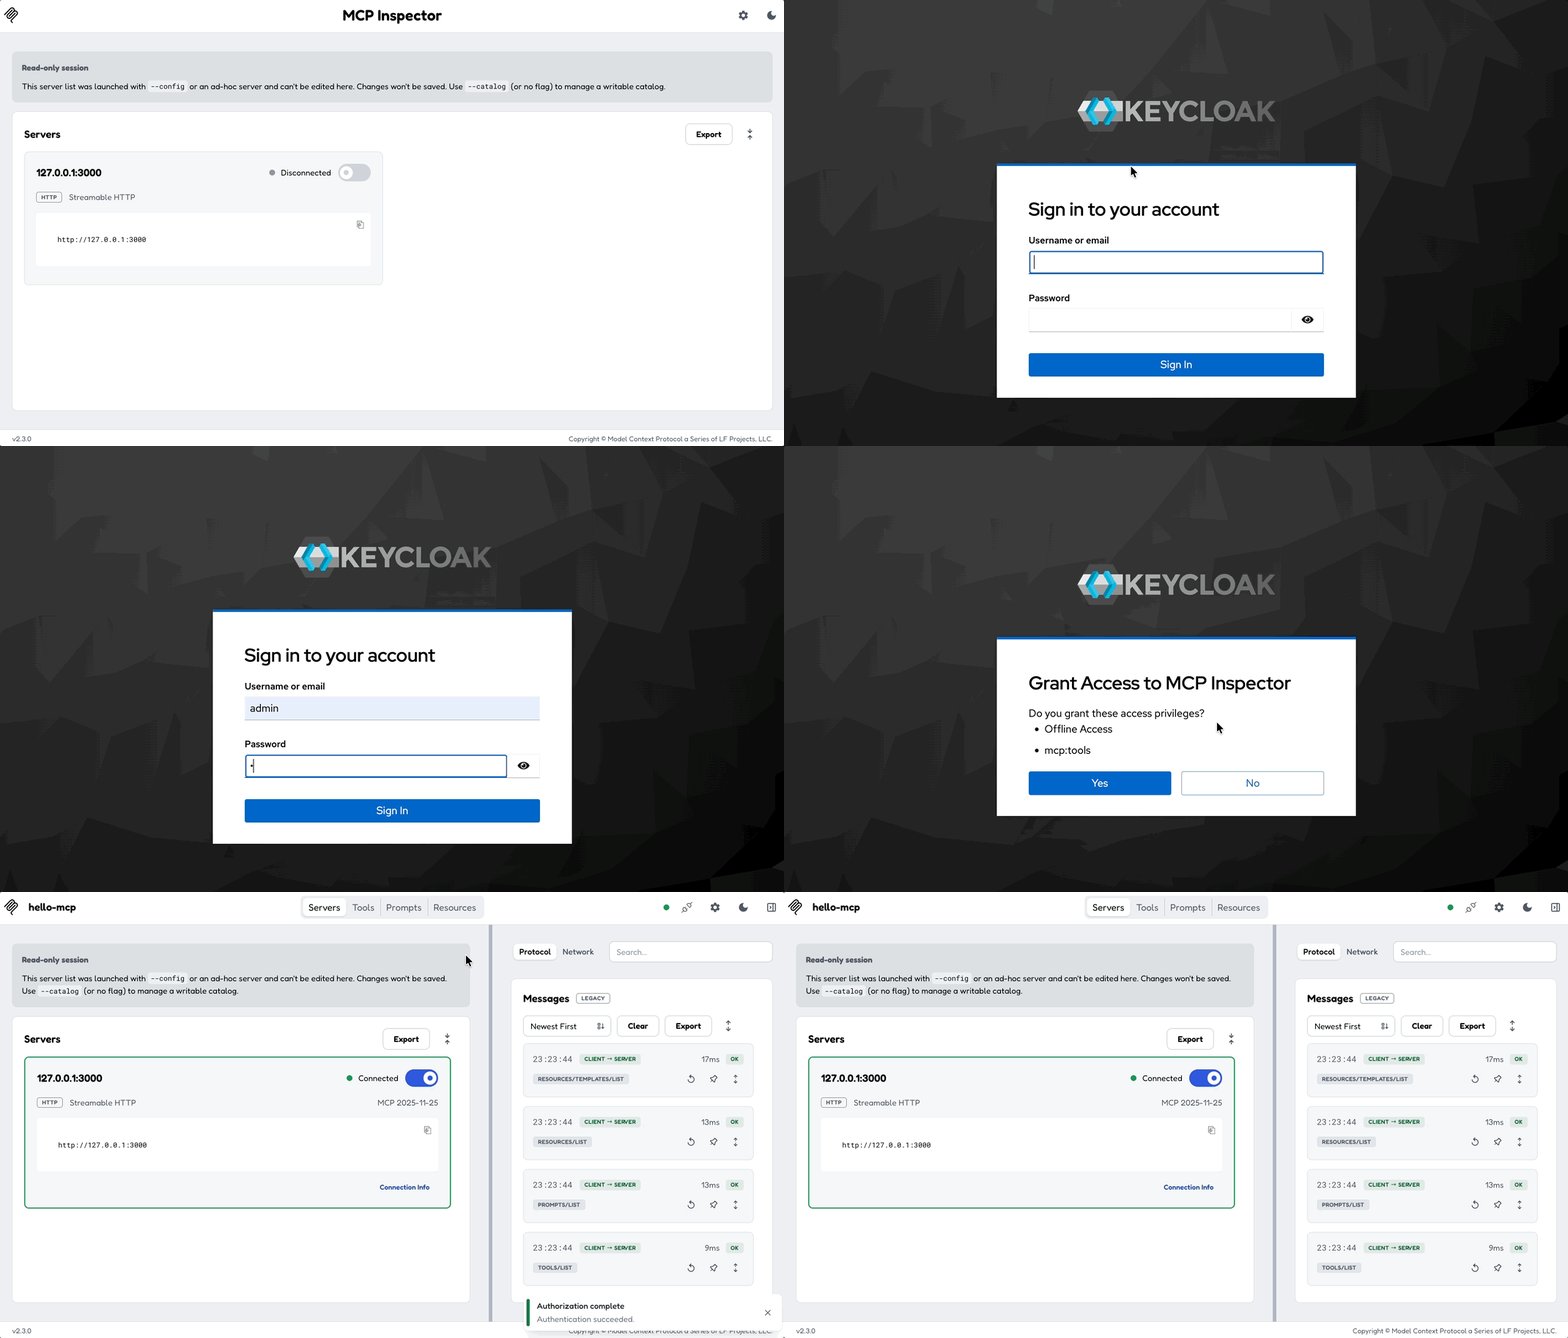
Connect via MCP Inspector - you'll be redirected to authenticate before accessing tools.
How it works
- Client connects → server returns 401 with OAuth metadata endpoints
- Client discovers Keycloak via the metadata and performs Dynamic Client Registration (DCR)
- Client gets a token via Authorization Code flow + PKCE
- Client sends
Authorization: Bearer <token>on every request - Server validates the token (JWKS first, then introspection fallback)
- Valid → tool executes. Invalid or expired token → 401 (
invalid_token). Valid token without the required scopes → 403 (insufficient_scope).
Supported providers
You have two ways to add authentication, depending on your identity provider:
RemoteAuthProvider(generic) - connects to any OAuth 2.0 / OpenID Connect server that supports DCR. You supply the discovery URL and a token verifier yourself; see the RemoteAuthProvider reference.rust-mcp-extra(ready-made) - drop-in providers for common identity platforms, wired up exactly like the Keycloak provider in this tutorial:
| Provider | Reference | Notes |
|---|---|---|
| Keycloak | Keycloak | Self-hosted, free |
| WorkOS AuthKit | WorkOS | Managed auth |
| Scalekit | Scalekit | Enterprise auth |
For the full generic RemoteAuthProvider flow, see the working examples in the SDK repo: mcp-server-oauth-remote.rs (server) and mcp-client-with-oauth.rs (client).
What you learned
-
KeycloakAuthProvider gives you a complete OAuth setup in a single
new(...)call -
AxumServerOptions.auth enables authentication with one field
-
runtime.auth_info()gives you the authenticated user's claims -
For non-Keycloak providers, RemoteAuthProvider + a token verifier covers any OAuth server
Where next
- Server auth without DCR → Token Verification
- Client-side OAuth → Client OAuth Flow
- Ready-made providers → rust-mcp-extra